Monday, March 12, 2012

More stitching

I have a bit of a thing for Pinterest. It's kind of addictive. I currently have boards full of ideas for things to make in the future.

One of them was especially inspiring though: this embroidery. Love it! I kept going back to look at it so thought I would have a go at creating one of my own.

At the same time I was throwing around ideas for a new Kindle cover, and thought I would combine the cover with the embroidery.

I've seen a lot of Kindle covers online and most of them were much fancier than I wanted. A lot of them open like a book, or have an inbuilt stand so you don't actually have to hold your Kindle. I didn't want any of that, part of the beauty of the Kindle for me is its simplicity. All I wanted was a simple slip cover to keep it free from dust, scratches and toddler fingerprints.

I embroidered the cover design using three strands of DMC cotton. The entire design is French knots. Hundreds of them! It actually came together reasonably quickly though, and it was pretty relaxing to stitch away in front of the tv at night.

I'm pleased with the final product but if I did it again (and I won't!) I would make the font thicker. I would also outline the edge of each letter in a split stitch or back stitch to make it look crisper.


The finished product. I stitched on to the most beautiful linen from Kelani Fabric. The cover is a simple slip cover lined in a blue and white polka dot. It closes with a velcro tab (was initially a magnetic button but that was too clunky, so I had to get out the seam ripper).


Stitching detail.


French knots - this is only my second embroidery so I had to re-learn how to do these. I really recommend the tutorial on Sublime Stitching.


Same linen as I made my journal cover in. Love the look of them together (yes, I'm a dork).

Thursday, March 8, 2012

More tiny shoes

Almost a whole month since I posted - eek!

I have been busy though, lots of crafting and sewing but the things I'm working on are sloooooow. It's satisfying seeing them come together but I've been itching for a quick project to get some instant gratification. So last night I sewed up a couple of pairs of baby shoes for my friend's brand new baby boy.

I made a pair of cloth baby sneakers, and some super cute baby boots for Winter.

The boots are made using a scrap of Kokka monkeys left over from this shirt, and lined with minkee. The sneakers were made using the gorgeous green elephants from Daiwobo, and lined with some orange dots (not so sure about that combination in hindsight).

I used two patterns from the fabulous I Think Sew: the Cameron sneakers and the Charlie boots. I really recommend these patterns, they're fabulous. I have many more waiting to be made up. I Think Sew also have some gorgeous handbag patterns - the bag I made recently was one of their designs.

I am especially in love with the boots and have plans to make some for my littlest this Winter. I don't think I'd use minkee lining again though, it was a bit of a nightmare to work with. If I did, I would take off a quarter inch all around, as it stretched a bit and is a bit baggy in the finished boots.

So there you have it. I hope to be a bit more regular with my blogging as my many works in progess are finished.


Minkee monkeys. Love love love this pattern, so quick and such a cute result.


Cloth baby sneakers. I think a more neutral lining would have been better, but I'm still happy with them.

Saturday, February 11, 2012

Balloon bubble

More baby sewing! I love sewing for my littlest, it's so quick and cheap, with most things needing only a half yard of fabric.

I recently finished making her a new bubble/romper. I used Kwik Sew 3776 (as used here) as a base, but recut the front bodice and straps as one piece, and added some white piping. I sewed a bigger size too, my wee girl is now five months and growing far too quickly.

The fabric is from the gorgeous Children at Play line by Sarah Jane. I really love this line, but have to admit to not initially being too fussed over this particular print. I bought most of the collection online, but when I saw this fabric in my local fabric shop I just had to have it. The colours are fantastic.


Finished bubble - front view


Bodice detail


Back view. I used white snaps to match the piping.

Saturday, January 14, 2012

The Katie bag

I probably sound like a broken record but I just love, love, love Echino. If I was limited to only buying/sewing with one type of fabric for the rest of my life I'd choose Echino, and die a very happy woman.

My little Echino collection is growing rapidly, thanks in part to my little sister who recently found some for $9/metre while in Japan. And although I could stare at it all day long, it's wasted in my sewing cupboard, so I'm trying to use it where I can.

I discovered a great little site a while back called I Think Sew. She has beautiful patterns - mostly handbags and shoes - and I was drawn to her samples, especially as many of them use Echino.

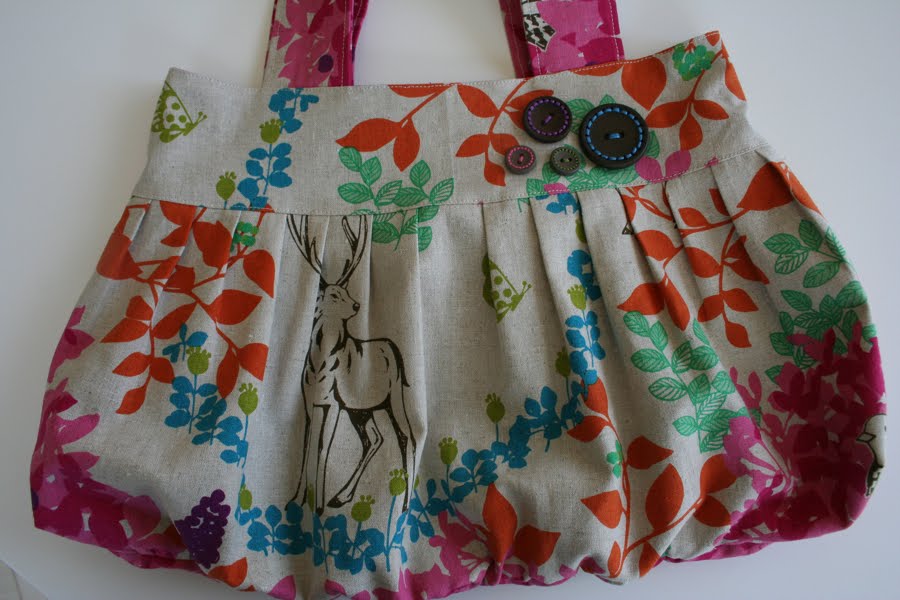
I bought few patterns, including the Katie Bag. I'm not usually a bag sewer but I really liked this one, and thought it would look great made up in some of my favourite fabric. The pattern came together beautifully. It's fairly simple but the result is fantastic. The bag is supposed to have a belt on it (which I love, it's what drew me to the pattern) but I felt the fabric was too busy for the belt, so included some wooden buttons as a focal point instead.

So on to the pictures... I really love the finished product but realise it's not everyone's cup of tea. I actually made this for my sister-in-law but am going to make another for myself.


The finished bag - front (looks a bit gaudy in full sun!)


Front detail


The back - a little bit more pink!


Lined in a grape coloured cotton canvas with a magnetic closure. I included a small pocket made of the exterior fabric.


The buttons I included instead of the belt. I stitched these with coordinating cotton.

Sunday, December 18, 2011

Christening gown for my baby

We had our baby girl's Christening this morning. It went really well and I feel like I can relax now - so much work for such a little person!

Most of that work has been sewing. I made Baby A's Christening gown and while I'm really happy with it, it was a lot of work, especially while juggling a baby, 2yo and 3yo. It's made from satin and lined with silk. I'm looking forward to never working with satin again. That fabric has a mind of its own.

The pattern is a modified Oliver + S bubble dress. I didn't sew the bubble, instead opting to lengthen the skirt and lining to create a long dress and pettiskirt. I edged both skirts in a gorgeous tatted lace. The bodice was also finished with the same lace, and I had a ribbon sash at the back.

We incorporated a little history with some 100 year old lace sewn into the sash at the back (from Baby A's great grandmother's Christening gown). The buttons were from Baby A's paternal grandmother's stash (she died before Baby A was born and left me her buttons and sewing machine) and I also made little mock bows to cover the buttons. Baby A wore her great-grandmother's 100 year old crocheted bonnet.

I also made a little pair of shoes for her. The Ottobre Tepsukka pattern, but with the pintucks omitted.

The kicker - I had to do all of this twice, as I also made a dress and shoes for my niece (kind of) who was also Christened today. Early to bed for me tonight!


The finished dress


Front bodice. Love those cap sleeves and am looking forward to making the bubble dress in cotton.


Love this lace


Mock bows on the back bodice...


... covering the buttons


I omitted the pintucks and used the lace instead. Finished with a pearly snap.


Dresses x2 (headaches x 10)

Tuesday, December 6, 2011

Everything old is new again

I developed a bit of an obsession a few months ago for vintage sheets. The colours and designs really appeal to me - some of them are so ugly they're beautiful!

I started collecting them a few months ago and after my baby girl was born started a vintage sheet quilt for her (which I really need to bind). I am particularly in love with one of the designs, from an old pillowcase, so decided to use the leftover fabric to make baby A a little romper for Summer.

The pattern is Kwik Sew 3776. The sizing is spot on and it looks cute, but the construction left me scratching my head at times. Next time I will make a few changes to make it a bit neater, both inside and out.

All in all I'm happy with it. Baby A looks so cute in it - just like the little ray of sunshine that she is. And at $2 for the pillowcase, it's super cheap an original.


The front. It has a crotch opening for nappy changes.


Simple placket at the back.


Oh how I love these thighs!

Wednesday, November 9, 2011

Pitter patter of tiny feet

I have a bit of an addiction to baby shoes. Baby A owns around eight pairs a the moment that she'll outgrown in a matter of months. I can't help it, they're so cute and dainty, even if they're not all that practical.

I think I have mentioned before that I had three friends due to give birth around the same time as me. Well, two of them had little girls too, so I decided to share my love of all things cute and dainty by making them some little baby shoes.

The pattern is from Ottobre magazine - they're the Tepsukka Slippers. I adore them. They're a MaryJane style but with sweet little pintucks and a curved strap. I used a couple of fabrics that my mum brought back from Japan and plain cotton lining. I adore them! Baby A will be getting several pairs over the next year or so.

The construction is fairly simple, although they are teeny tiny, and there are some very small curves to sew. I reduced my stitch length quite a bit to make life easier. This pattern is also intended to be used with corduroy, so I made my pin tucks slightly wider than usual to accommodate the thinner fabric.

I also made one friend a matching hat after she commented that she couldn't find a sunhat small enough for her daughter. I used the pattern from the Oliver + S book, Little Things to Sew. The smallest size was still too big, so I reduced it down to 90%, and it worked really well.


Pair for baby AM. I love the pink lining with the pistachio green outer.


Pair for baby S. The lining is actually pale blue, this photo is a bit dark.


I made the tucks wider than I usually would to allow for the thinner fabric.


LTTS hat, reduced to 90%. This gives a circ of 41.5cm, as opposed to 45% (I kept the half inch seam allowance).


Hat and shoes set :) The shoes are sz Eu17, which is about a US2 (I think).

Saturday, October 22, 2011

Long time between posts

It's been ages since I've blogged. It's actually been ages since I've connected with the online sewing world, apart from late night browsing on my phone.

But I have the best reason, a gorgeous wee six week old baby girl.

I can't begin to describe how much I love our little possum. She has filled a gap I didn't know existed, and she fits so beautifully into our family. She looks just like her big sister and is one of of those 'easy' babies I had heard about before but never experienced. My husband has said that if all our babies were like her he'd be keen to have a dozen more (but we won't, as we have also experienced what it's like to have a baby of the non-sleeping, poor-feeding, reflux-medicating variety!).

Our tiny wee girl has also been diagnosed with a permanent hearing loss, in both ears. It's been a stressful few weeks but we feel a bit better having some answers now. Her hearing loss is mild, which sounds fairly benign but she will need hearing aids to learn to speak and get by in life.

It's not what I want for my little girl and it's not what I'd choose for her - we all only want the best for our kids don't we? But I am not silly - I know many parents face far worse diagnoses than this, and I am really positive about her future. If anything her diagnosis has made me even more grateful for what we have. There have of course been tears and sadness, but we are moving forward and overall we are doing well. Many positives have come out of this too, especially the support I have received from my amazing friends, both online and in real life.

I don't share pics of my kids online but trust me when I say she's a little cutie. Dark hair, fat little cheeks, big blue eyes and a rosebud mouth. She's soft and gentle and always has a smile for me. She really just melts my heart.

I could go on all day, but won't, as this is a sewing blog. I only started sewing when my oldest child (another daughter) was 2 years old, so I have never had the pleasure of sewing for a baby girl all of my own. That's about to change! I have a few projects on the go and many more patterns earmarked to make for baby A over the coming months.

For now, I'm going to share an outfit I made for my 3.5 year old daughter a few days before giving birth. It's the family reunion blouse and puppet show shorts, both from Oliver + S.

I've made the shorts before but this was the first time I've sewn the blouse. As you would expect from O+S it's a great little pattern that is cleverly put together. I sewed it using a French floral fabric I got from my local fabric store a year or so ago. It's finished with my favourite pierced wooden buttons and coordinating lilac embroidery thread.

The shorts pattern is a favourite. It is out of print now but O+S have recently released it as a downloadable pattern - hurrah! If you take a look at the O+S Flickr group, some versions of these shorts don't have much gathering around the leg opening. Early versions of this pattern had a mistake in the leg binding - the errata is on the O+S website. If you own this pattern I really recommend checking it to see if it's affected by the mistake, as the leg gathers are just so cute and really add something to the shorts.

That's all for now. I hope to be back blogging regularly soon with some sewing for our tiniest family member.


The finished outfit.


Tab and pintuck detail. I threaded the buttons with lilac floss.


I used the same buttons down the back.

Wednesday, August 31, 2011

Happy birthday baby!

My wee boy turns two on Friday and I can't believe it! It really does feel like he was born a few months ago. I'm feeling it even more acutely with the impending arrival of his little brother or sister in a few weeks.... I think he is too. Last night after his bath I wrapped him up in his towel and gave him a big cuddle. He rested his head on my cheek and said 'I'm mama's baby'. Eek! I think we are in for a few interesting months ahead.

I really wanted to make my little guy something special for his birthday. I wasn't sure about his initial request for a 'cookie monster dress', but I let him choose some cute Kokka cars fabric from my stash which he just adores, and decided to turn them into some shorts for him. He hasn't seen these finished yet, but got very excited when he saw me sewing up the fabric. He should love them.

They're pretty much the same as the helicopter shorts I made recently. O+S Sketchbook pattern, without the pleat, with a flat front, and two rows of topstitching on both sides of the fly, up the rise, on the pockets and up the outer seam. A few minor alterations that gave me the casual look I was after.

I also wanted to make him a shirt, and as usual turned to my O+S Sketchbook shirt pattern. I've made this several times now and am always looking for ways to make it a bit different. In the past I have monogrammed and also embroidered the pocket. This time I decided to applique a little dinosaur peeking out from under the pocket, as my wee guy loves dinosaurs, and I was keen to avoid using a dinosaur print (I love novelty prints, but need to draw the line somewhere!).

I sketched the dinosaur freehand onto some vliesofix then blanket-stitched it by hand onto the shirt. The eye is satin-stitched. All in all it only took about 20 minutes and I really like the lift it gives the shirt.

I also used the spotty fabric I used for the dinosaur on the inside of both plackets and the underside of the collar. It's not immediately obvious but peeps out hen the shirt is being worn.

All in all I'm happy with this shirt. The fabric was a bit of a nightmare though. It's lovely to look at - a very fine striped aqua and white cotton, but it's very, very crisp and creases so easily.

I'm wrapping these up for the little guy to open on Friday. Happy birthday baby!


Dark and blurry sorry, but here's the finished shirt.


Dino detail! T should love this.


The inner plackets and under-collar both have the same spotty fabric I used for the dinosaur, to tie everything together.


T's brm-brm shorts.


I did two lines of top-stitching on both sides of the fly, pockets and outer seam (plus the rise, which you can't see here).

Saturday, August 27, 2011

Japanese jumprope

A year or so ago my mum bought back a whole heap of fabric from a trip to Japan. One of these fabrics was a $4, 1.1 metre remnant that I fell in love with instantly. It was a lilac-grey linen and cotton blend with little bunches of deep pink and red flowers and strawberries scattered all over it. I knew as soon as I saw it that it would eventually become an Oliver + S jump rope dress.

I made view B of the jump rope last Summer and it was hugely popular with Sweetpea and me! In fact I think that dress may be one of the most favourite things I have ever sewn.

This year I sewed up a size 4, which has a fair bit of growing room for the rest of the season. I also added a wee bit of length for my beanpole.

The plackets, sleeve tabs and pocket trims are made up in a hot pink pure linen. Gorgeous fabric but it has a life of its own and slipped all over the place when trying to sew it.

Not much more to say about this - love the pattern and love the fabric, so am pretty happy with this dress. I am still sewing & nesting like mad, and now have two new baby girls to sew for ASAP before my own baby arrives in (hopefully not less than) three weeks.


Sorry for the shocking photo... here's the dress!


MOP buttons (which I think are a little too big?) and pink topstitching on the collar.


I think the pockets really make the dress.


My mum is fab: she watched the kids for me a few weeks back, and when i came home she had folded a flower hairclip out of the dress scraps.

Tuesday, August 23, 2011

Otto shorts

One of the hardest things about sewing for boys is the lack of variety. There's just so more choice when it comes to patterns and fabrics for girls. Having said that though, there's a lot of brilliant stuff out there and I can usually find inspiration on other blogs or Flickr.

I'm still trying to get most of my Summer sewing done and that includes lots of shorts for my little guy, who wears little else over Summer. I have a few patterns, but am reluctant to buy more as they're all just variations on a theme. That's why I like Ottobre magazine so much, lots of boy patterns every issue that I probably wouldn't purchase individually, but really appreciate.

These shorts are from Ottobre 3/11. I like the way they're a bit shorter than most of the other patterns out there, and the little cuff detail is something a bit different (to be honest I wasn't sure about it, but was itching to do something 'new', and I really like the end result).

This is only my second Ottobre attempt. On one hand it's kind of refreshing to have minimal instructions - there's certainly no hand-holding! On the other hand the finish isn't quite as polished as you'd get with say an Oliver + S pattern. I learnt a few new tricks making these though - constructing the waistband without having to thread through elastic on a safety pin was a revelation... sooooo much easier than the way I usually do it!

I sewed them in navy and white seersucker with red topstitching. There's a lot of topstitching in this pattern - two rows on most seams. I love topstitching though, although using such an obvious colour made me a bit more cautious than usual. The seersucker was from my stash (leftover from this shirt) - if I had purchased fabric for these I would have gone with a broader stripe, but I'm trying to chew through my fabric stash at the moment.

I made these in a 92 and they fit beautifully on my big, little boy.


The finished shorts. They've got patch pockets with a little flap, faux fly and a little crossover cuff detail.


*sigh*. This is the best photo I could get of my little guy wearing them. You are growing up too fast mister.


The fly with bar-tacks.


Cuff detail. Didn't like this initially but do now.


Pocket detail. I like the diagonal buttonholes, and chose red and white contrast buttons.

Saturday, August 20, 2011

Popover squirrel dress

I've been sewing Oliver + S for as long as I've been sewing, yet it's taken me until now to sew the (free) popover sundress pattern. Why? I have no idea. I think i just run out of time each Summer, and there is usually a new whizz-bang pattern that takes priority over this one.

This year I have made a head start on the kids' Summer sewing, and was recently given some gorgeous Echino fabric that suits this pattern perfectly.

I matched the Echino with some linen scraps I had left from old projects, and trimmed the yoke and hem with some cotton lace I had left over from making a friend's bridal garter a few months back.

I added a little squirrel pocket to complement the dress. I wish I could take credit for this idea, but I cannot - I took the idea from this Etsy store. Making the pocket was easy. I traced a squirrel clipart directly onto the linen from the computer screen, then fused another layer of linen to the back using vliesofix. I then sewing around the edge using a very short zig zag stitch, clipped around the edges and straight stitched it onto the dress.

This is such a sweet pattern and so quick to sew up. I hope to make a few more, as it suits our hot Summers.


The finished dress. Size 4 with extra length. It's a little roomy, but will be nice and cool to wear.


I love the Echino with the linen and lace. If you haven't seen this fabric in real life, it's a much softer purple than it looks here.


Lacy hem.


Squirrel pocket


Pockets are always a hit with my wee girl.